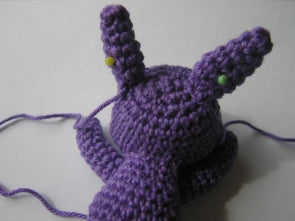
This pattern is available for free right here below in this blog post! However, if you’d prefer to download the PDF, you can purchase it for a small price here. The printable PDF version combines all text and pictures in an easy format for you to print at home or to save onto your computer and use on your tablet or phone.
I’m happy to present you this free lazy bunny pattern! This pattern is easy and quick to make, so in no time you’ll have your own little bunny to gift or to add to your crochet family. The pattern is fairly small, so it can also easily be made with some scrap yarn you’ve got around!

You will need:
- One small skein of yarn
- A black thread
- Polyester stuffing
- One pair of safety eyes
- Your favourite crochet hook
- Your favourite sewing needle
For the bunny in the picture I personally used:
- 4.5 mm eyes
- 2.25 mm hook
- Paintbox Yarns Cotton DK in Sky Blue
- Paintbox Yarns Cotton DK in Dusty Lilac
- Paintbox Yarns Cotton DK in Soft Fudge
Abbreviations:
sc = stitch
inc = increase
dec = decrease
hdc = half double crochet stitch
dc = double crochet stitch
sl = slip stitch
blo = back loop only
flo = front loop only
fo = finish off
( … ) = repeat whatever is in between the brackets
[ .. ] = total amount of stitches in that round
Tips:
- Stuff really firmly!
- Stitch very tightly, so no holes show when stuffing. You can do this by using a smaller hook than your yarn label recommends, and by pulling your thread a little after every stitch.

Head
1. 6 in a magic circle [6]
2. ( inc ) x 6 [12]
3. ( sc, inc) x 6 [18]
4. ( 2 sc, inc) x 6 [24]
5. ( 7 sc, inc) x 3 [27]
6-8. sc around [27]
9. ( 3 sc, inc) x 3, 15 sc [30]
10. ( 4 sc, inc) x 6 [36]
11-12. sc around [36]
Put the eyes between row 9 and 10 with 6 stitches between them.

13. ( 4 sc, dec) x 6 [30]
14. ( 3 sc, dec) x 6 [24]
15. ( 2 sc, dec) x 6 [18]
16. ( sc, dec) x 6 [12]
17. ( dec ) x 6 [6]
Fo and work away your thread.
Ear (make 2)
1. 5 in a magic circle [5]
2. ( sc, inc) x 2, sc [7]
3. sc around [7]
4. ( sc, inc) x 3, sc [10]
5. sc around [10]
6. ( 3 sc, dec) x 2 [8]
7. ( 2 sc, dec) x 2 [6]
Fo and keep a long thread for sewing. Don’t stuff.
Sew the two ears on top of the head. Make sure the ears are facing towards the front of the head, where the eyes are! If you prefer, you can also sew on the ears at the end.

Leg (make 2)
1. 6 in a magic circle [6]
2. ( sc, inc) x 3 [9]
3. sc around in back loops only! [9]
4-7. sc around [9]
Fo your first leg. Don’t fo the second leg!
Take both your legs. You will continue crocheting around, starting from your endpoint at the second leg, but instead of crocheting another round on your second leg, continue crocheting around your first leg. Once you’ve done all 9 sc, continue once again on your second leg and make 9 sc around there. This way you will mend the two legs together and make one new large round of 18 sc.

Body
1. follow the instructions above [18]
2. sc around [18]
3. 5 sc, ( inc, sc) x 5, 3 sc [23]
4. 8 sc, inc, 5 sc, inc, 8 sc [25]
5. sc around [25]
6. ( 3 sc, dec) x 5 [20]
Start stuffing the legs and the body as you crochet along.
7-8. sc around [20]
9. ( 3 sc, dec) x 4 [16]
10. 9 sc, dec, 5 sc [15]
11. sc around [15]
Fo, don’t close, and leave a long thread for sewing.
The body has a flat side (the bottom) and a curved side (the top side). Place the body and the head on a flat surface and carefully push the two against each other to see how they fit together best. Pin them together with a few pins and when you’re satisfied with their position, sew them together.

Arm (make 2)
1. 6 in a magic circle [6]
2. ( 2 sc, inc) x 2 [8]
3-10. sc around [8]
Fo, stuff and leave a long thread for sewing.

Tail
1. 4 in a magic circle [4]
2. ( sc, inc) x 2 [6]
Fo, and leave a long thread for sewing.

Sew the arms to the sides of the body, right next to where you attached the head to the body. Sew the tail on the curved side of the body, on the lower back.
I hope you’ve enjoyed crocheting this project! This pattern will always be available for free in this blog post. However, if you’d prefer to download the PDF, you can purchase it for a small price here. The printable PDF version combines all text and pictures in an easy format for you to print at home or to save onto your computer and use on your tablet or phone.


4 commenti
My 7 year old loves bunnies and her best friend kitties, so I made a matching pair for them , thank you for the patterns!
Olá, não há com indicações em português? Seria muito mais fácil, para mim. São adoráveis estes amigurimi. Acho que vou fazer todos 😍
Muchas gracias por sus patrones e instrucciones!
Nos anima a emprender estos lindos proyectos en punto amigurimi.
Me gustan estos muñequitos, però aun no he hecho ningú no. Quisiera probar. Gracias.